
Wired HD IP Bird Box Camera 1st & 2nd Gen setup on Windows PC/Apple Mac (NCIP2, NCIP9)Updated 3 months ago
This guide shows you how to set up your Wired HD IP Bird Box Camera on a Windows PC or Apple Mac computer.
- Before You Begin
- How to connect the cables
- Connecting the camera to your computer
- Viewing the live camera feed
- Need more help?
Before You Begin
- Make sure your Windows or Apple computer is connected to the same internet network that you're going to connect the camera to.
- Download and install VMS (for Windows) by clicking this link or VMS (for Mac) by clicking this link. If installing on a Mac, make sure you drag the application file onto your desktop instead of into the applications folder. If your Mac computer tries to stop the program from being installed, have a look at this Apple support guide for help: https://support.apple.com/en-gb/guide/mac-help/mh40616/mac
- If you're using a Mac on the Big Sur OS, you'll need to give the programme permission by going to System Preferences > Security > General.
How to connect the cables
First, empty out the bag that contains the parts for the waterproof connector. You should have all the items below:

Now you need to assemble the waterproof connector, this ensures that when the camera is in place in your garden there'll be minimal chance of water getting to the connection and causing damage to the camera.
If you look at the picture above you will see the four parts are numbered, what you need to do is assemble them as shown in the image below.
If your network cable has a plastic sheath on the end, you can push it down as shown in this video:

Parts 1, 2 and 3 are placed on the cable that will connect the camera to your router or network video recorder (NVR). Part 4, the small O-Ring, is placed on the connection from the camera, making sure that it sits flush against the body of the connector.
Now plug the cable into the camera and clip part 3 on to the connector on the camera:

Slide part 2 down the cable until it sits underneath the plastic fins at the end of part 3:

Finally, screw part 4 on to the end of part 3:

You now have a waterproof ethernet connection for your camera. Whilst we don't recommend submerging the connection it will provide a good level of protection against the elements in your garden.
How to connect your camera
The next step is to connect the camera to your network using the POE injector included in your bird box camera kit.
Your POE Injector has two ethernet ports: one labelled POE and one labelled LAN. Connect the cable from the camera to the POE port and connect the other cable from the LAN port to your router. Make sure that the POE injector is also connected to a power socket using the included power cable. Your setup should now look like the image below, with one cable running from the POE injector to your camera and one cable going back into your router.

Connecting the camera to your computer
1. Click on the VMS icon to launch the programme, the box will appear. The username and password will be auto-filled, but by default the username and password are both admin.

2. In the "Home" view, click “Device Manager”

3. Click the “IPV4 search” button. The available devices will display on the section at the top.


4. Mark the checkbox in front of the IP address,

5. Click on the tick box next to the device that appears in the list then click the “Add ” button. The IP camera will move into the box below.

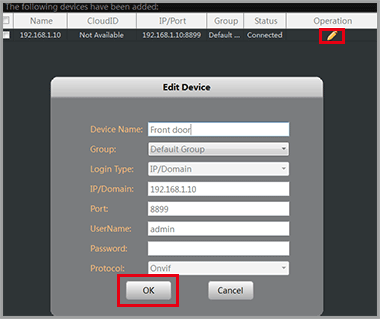
6. Click the pen icon under “Operation” and a new window will pop up. You can name the camera if you like, then just click “OK” to save it.
7. Once the software has connected the camera successfully, the “Status” will change to “connected”

You have now configured the camera, next we'll show you how to watch it.
Viewing the live camera feed
1. Click on the "home" icon.

2. Click "Live View" to view the camera.

3. Double click on the name of the camera to start the live view.

Need more help?
If you need help with anything else please check out our other guides or get in contact.